Where did he go?

Where did he go?

John asked me to remove a person from this photo that he sent me. This was so the restored photo could be put in to a book he was publishing.

The process of removing someone from a photo is a little more complicated than most people seem to imagine. I wish there was a simple magic brush that we painted over the unwanted area and then it removed the person. In reality there is more to this type of photo restoration.

Firstly we have to remove the person by cutting them out. On the digital screen we draw a selection around the person to be removed and then delete this area. This leaves a hole in the image and this needs to be filled by what we imagine was behind the person. In this case it was some steps and a wall. Using the clone and healing tools we have to clone surrounding areas to slowly fill in the missing areas to restore the missing pieces and complete the restoration.
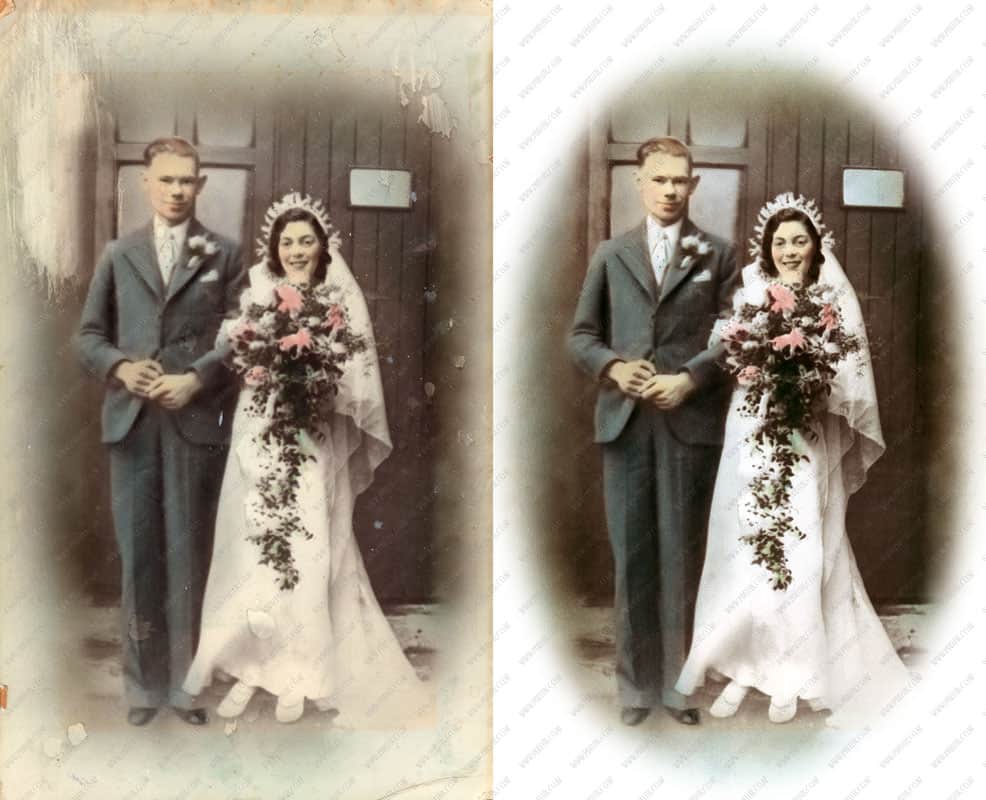
Before and after…

Where did he go
Removing man on left $60 plus prints.

Read more about pixelfix

Customer Feedback

Hi Richard,
They look great. Many thanks.

John Millar – Auckland

Removing cat pee

Joy brought in this wonderful old photo that needed to be restored because it had been damaged by her cat. This was a very old portrait of a solder that had been framed in a dome-shaped frame. This meant that I couldn’t scan this on a flatbed scanner as it was flat. So we digitized this by taking a high-resolution photo. This gave us a digital image that we could work with. In Photoshop we then removed the damage to the surface areas and replaced the background. The new background meant that it could now be printed and framed into a normal frame.

Removing Cat Pee Before and After Photo

Removing cat pee
Heavy restoration on large photo $250 plus prints

Another 5 Star Review and Great Photo Restoration

Urshila brought in this wonderful wedding photo taken in 1978 to be restored. The photo had some discolouration from ageing and Urshila wanted the highlights removed from the back wall area.

Great Photo Restoration

The Picture restoration process consisted of correcting the colour  using curves adjustment layers and a selective colour correction layer was added to remove the discolouration. Then all that remained was to use the healing and cloning tools to remove the highlights. I printed out a nice large A3 photo for them to go back up on the wall. 

Urshila was so happy with her photo restoration that she was kind enough to add a review on google you can read about it here.

Wow that looks great!
​-Urshila

Richard has done a great job restoring my parents old wedding picture. He did it within a week and there were no hassles at all. Great communication and 5 star work!
​-Urshila

photo restoration

Large colour photo restoration $80

Another great review!!

Cameron had sent me this wonderful studio portrait that had been damaged. The bottom of the photo had been torn off and we had to patch this up to appear natural. The photo had also faded and lost come of its colour. This was also restored at the same time. The completed photo now looks really nice and is back up on display  to be enjoyed for many years to come.

Cameron liked the restoration very much and he left a wonderful review for others to see how his restoration turned out. There are many many more reviews. To read more please like the page www.facebook.com/photorestoration

BEFORE & AFTER

Colour Photo Restoration
Light Restoration Level $80 plus prints

REVIEW

Scanning For Restoration

Mike had borrowed this large aerial photo of his old property and wanted to get this duplicated and restored for various members of his family. The photo is a large 20" x 30" print. Very typical of this type of photography. The age and sun had done their work and rendered the image with a strong red colour cast. The colour required restoration and a wide disbursement of small blemishes that always come with photos of this size needed to be removed.

Scanning For Restoration

One of the main difficulties with photo this size is digitising the image so it can be worked on the computer in Photoshop. Scanning such a large image requires either a VERY large flat bed scanner. They don't exist. Not that can be afforded. Or a series of smaller scans that are then stitched together in Photoshop to complete the whole picture. A third option is to photograph the entire image using a high resolution camera. This time we used lots of smaller scans to make up the whole photo. eight scans in total were used.

CUSTOMER FEEDBACK

Hi Richard,

Thanks for that, it looks great.

Mike - Auckland

BEFORE AND AFTER

Click to enlarge and see if you can spot the joints.

Colour Photo Restoration Scanning For Restoration
Medium level restoration $130 plus prints

Old Soldiers Should Never Fade Away

Amy sent me this very badly faded old photo by Courier Post. When it arrived it was virtually gone, it was barley visible. But I did a scan and using a variety of Multiple Layers and some heavy burn and dodging I was able to bring this old soldier back. But when the image became visible again.

Old Soldiers Should Never Fade Away

So did the hundreds of small cracks that covered the surface of the photo paper. You see this was not the original photo it was a copy that had been made at some time using a 'dye sublimation printer'. They are very commonplace and will most likely find them in your local pharmacy where they use them for passport photos or to provide prints from a Kodak kiosk. the problem is they don't last!! and this is how they end up... faded and cracked!

A few hours of extra work was needed to remove the cracks and finish off the restoration. To the delight of Amy who was over the moon. So much so she gave us a 5 star review on Google.

We had a photo which had almost disappeared due to sun damage and had been told it was not possible to save. Luckily I decided to have 1 last try and Richard did an amazing job giving a beautifully clear photo. Thanks.

Amy - Dunedin

Before and After Old Soldiers Should Never Fade Away

Faded Photo Restoration
Medium Restoration $150 Plus Prints

Close Up Example

Old Soldiers Should Never Fade Away
Photo restoration close up

How to remove mould

Todd sent me this very old and tired photo for restoration. It had suffered some severe mould damage and needed a good cleanup in Photoshop . The mould shows itself as light and dark patches. But because there are so many we can't use the spot removal or the healing brush in the normal way.

How to remove mould?

If you do then the light and dark patches are 'merged' and they become neither, ending up is a mid-tone grey. What was needed was to pick an area and decide if the surrounding blotches needed to be made lighter or darker to match the good areas.

Then using the healing tool set to either 'lighten' or 'darken' mode I was able to match the damaged area with good areas, without merging the two and making everything muddy and grey. The results are very good and the faces became much more visible and the whole photo looks very presentable.

Google Review

Richard at Pixelfix did the impossible by taking an old family photo from the late 1800s that was suffering from significant mould damage and fading. I didn't think he would be able to do much with it, but I was wrong. Thanks Richard for breathing new life into a cherished family portrait.

- Todd


Before & After

Photo Restoration B&W - How to remove mould
Medium Restoration 4+hours - $160 plus prints

A Colourful Wedding

Susan from the corromandel sent me this badly faded Colourful wedding photo. Unfortunately all the colour had been bleached away by exposure to the sun. On top of that problem this photo was also taken in the seventies. So guess what. Yes. Honeycomb textured paper!! This always makes thing more tricky and adds to the workload. But we have good success removing this normally and the results once the fading had been restored looked good. Adding back the colour then made the photo complete again. We tweaked the colours to match Susan's request and the wedding photo is now being enjoyed again.

Before and After Colourful Wedding Photo

Colour Photo Restoration
Medium Restoration $180 plus prints

Wedding Disaster

Wedding Disaster Unfortunately there were lots of moisture damage. I believe someone had spilt liquid on it then tried to wipe it dry.

Please don't do that at home. If you ever spill liquid on a photo then please don't wipe it. Just let it drip dry and hang it up somewhere. Once it is dry then contact us and we can then restore the damage. As you can see below It looks better than ever now it has been restored.

Before and After Wedding Disaster Photo


Photo Restoration
Medium Level Restoration $120 plus prints

Posts navigation

1 2 3 4 5 6 11 12 13
Scroll to top