How to remove mould

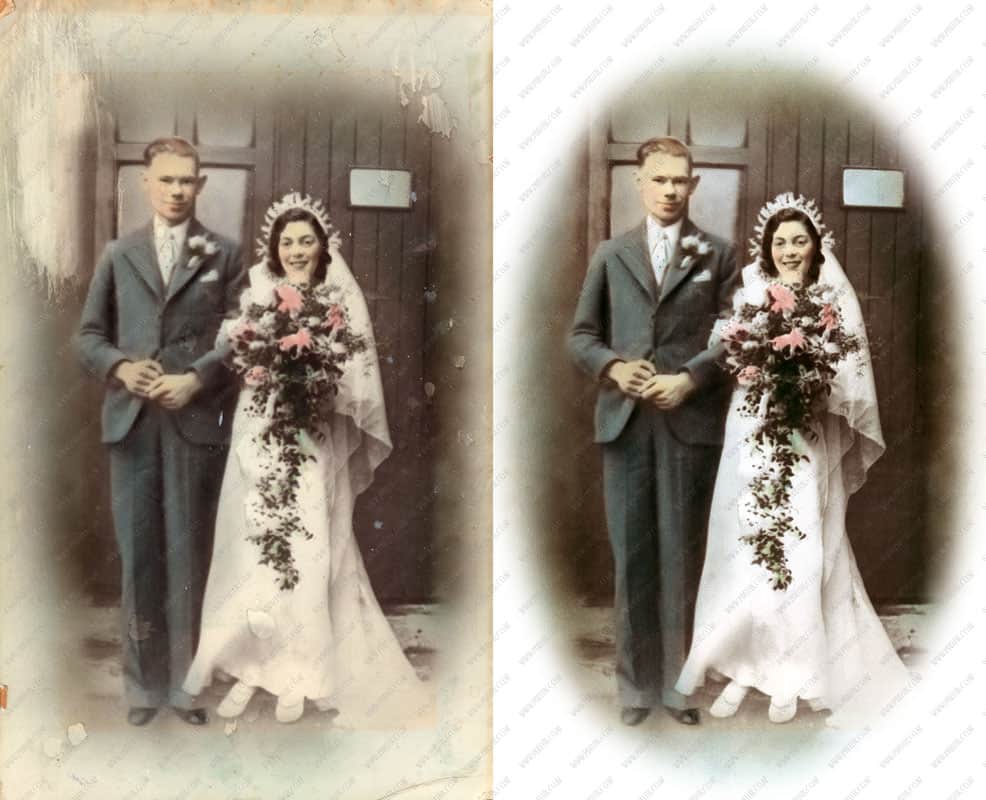
Todd sent me this very old and tired photo for restoration. It had suffered some severe mould damage and needed a good cleanup in Photoshop . The mould shows itself as light and dark patches. But because there are so many we can't use the spot removal or the healing brush in the normal way.

How to remove mould?

If you do then the light and dark patches are 'merged' and they become neither, ending up is a mid-tone grey. What was needed was to pick an area and decide if the surrounding blotches needed to be made lighter or darker to match the good areas.

Then using the healing tool set to either 'lighten' or 'darken' mode I was able to match the damaged area with good areas, without merging the two and making everything muddy and grey. The results are very good and the faces became much more visible and the whole photo looks very presentable.

Google Review

Richard at Pixelfix did the impossible by taking an old family photo from the late 1800s that was suffering from significant mould damage and fading. I didn't think he would be able to do much with it, but I was wrong. Thanks Richard for breathing new life into a cherished family portrait.

- Todd


Before & After

Photo Restoration B&W - How to remove mould
Medium Restoration 4+hours - $160 plus prints

A Colourful Wedding

Susan from the corromandel sent me this badly faded Colourful wedding photo. Unfortunately all the colour had been bleached away by exposure to the sun. On top of that problem this photo was also taken in the seventies. So guess what. Yes. Honeycomb textured paper!! This always makes thing more tricky and adds to the workload. But we have good success removing this normally and the results once the fading had been restored looked good. Adding back the colour then made the photo complete again. We tweaked the colours to match Susan's request and the wedding photo is now being enjoyed again.

Before and After Colourful Wedding Photo

Colour Photo Restoration
Medium Restoration $180 plus prints

Wedding Disaster

Wedding Disaster Unfortunately there were lots of moisture damage. I believe someone had spilt liquid on it then tried to wipe it dry.

Please don't do that at home. If you ever spill liquid on a photo then please don't wipe it. Just let it drip dry and hang it up somewhere. Once it is dry then contact us and we can then restore the damage. As you can see below It looks better than ever now it has been restored.

Before and After Wedding Disaster Photo


Photo Restoration
Medium Level Restoration $120 plus prints

The Beauty of Black and White

Sunlight can be a powerful destroyer of Black and White photos. It leads to fading and discolouration. This sad old photo was on its way to the ghostly 'faded photo bin'. But I was able to restore the fading and remove the discoloration to return this damaged photo back to its form glory. Black and white is such a beautify medium I think and this is a fine example of that. Barry was so please he ordered 3 copies with frames.


Hi Richard,

Payment made via internet banking just now. Yes you may use the images as an example if you wish to do so.

Looks fantastic!

- Barry | Auckland

The Beauty of Black and White Before and After Photo

Photo Restoration
Light restoration Less than 2 hours $59


How Do You Restore This?

Removing surface damage, including cracks and creases is an everyday occurrence in photo restoration. This is the most common damage to old photos. The damage is most often because of people folding the photographs. This cracks the photographic emulsion surface and reveals the paper underside of the photo.

How Do You Restore This?

To repair this kind of damage we must use the magic of Photoshop. A few different  tools are used for this kind of restoration. but to restore the cracked areas and surface damage I use the 'healing brush' and the 'spot healing brush'. With the healing brush you can select which area you want to copy the pixels from and then select where to paste them.

As you paste the copied pixels, Photoshop analysis the surrounding pixels and adjusts the colour of pasted pixels to closely match those of the surrounding area. The Spot Healing Brush automatically selects the best area to copy from and matches to the surround pixels. This is a much quicker one step process as apposed to the Healing Brush 2 steps. But it can be less useful in very detailed areas.

Before and After

photo restoration
Light - Medium Restoration $80

Something for the weekend!

Colourizing old black and white photos is an art. It is amazing what can be achieved with this method of adding colour to old black and white photos. History can come alive. This old portrait of Queen Victoria was completely transformed when I added colour to it. I did this one just for fun. But I do like these results and thought I would share them with you.

If you would like to restore and add colour to your old black and white photos then please send us your photos. I'm sure you will also be amazed at the difference it can make.

Colourizing old black and white photos Before & After

colourized photo restoration - Colourizing old black and white photos
Colourized Photo restoration

Add colour and make your photo time travel!

Old black and white photos are wonderful. They show a time that was long ago. But when you add colour to a black and white photo. You bring them forward in time so to speak. Therefore they look real and they have more life to them. It is as though they were taken yesterday. It becomes an amazing transformation.

Add Colour

The process to do this colourizing magic is not all science. In fact most of it is down to artistic flair and skill. Once the original black and white image is restored and looking like new again, the re-colourizing process can begin.  The process all takes place in Photoshop but the colours are painted in by hand using a 'digital brush'.  The colours are all chosen by the artist too. We do not know from the black and white photo which shade of grey is which colour. So researching the period and other information including feedback from the client is all very important to the final result.

The photo restoration colourizing example below is a fine example how colour can really make a an big impact.

Before and After

Add colour to Black and white photo
Medium Restoration $140 plus prints

Let There Be Light!

Let there be light!

When Julia brought in this wonderful family photo for restoration. It was dark and had been laminated. A common practice with photos from the islands. But we were able to use the magic of Photoshop to bring back the brightness and also the colour. The difference is amazing and Julia was very pleased with the results.

Julia-

Hi Richard
Thankyou it looks great!

Before & After

colour photo restoration
Light Colour Restoration $60 plus prints

A Wedding To Remember

A Wedding To Remember

Faa brought us this very old wedding photo that he wanted to put back up on display again. The original was cut out with a pair of scissors and glued to some heavy board material.

Because the couple in the photo were both wearing wight it was very difficult to find any details. And so, using Photoshop, I had to paint in by hand the shading and outlines. We also added a bench for the couple to sit on. Replaced the background and sharpened up the image to make this photo come back to life. Faa was very happy with the results.

Before and After

Photo Restoration - A Wedding To Remember
Medium Photo Restoration $120 plus prints

Posts navigation

1 2 3 4
Scroll to top